KwikBond Guide: Applying Repox-Mix in Meat & Poultry Plants
KwikBond’s Guide to Preparing and Applying USDA-Approved Repox-Mix for Concrete Floors in Federally Inspected Meat and Poultry Plants

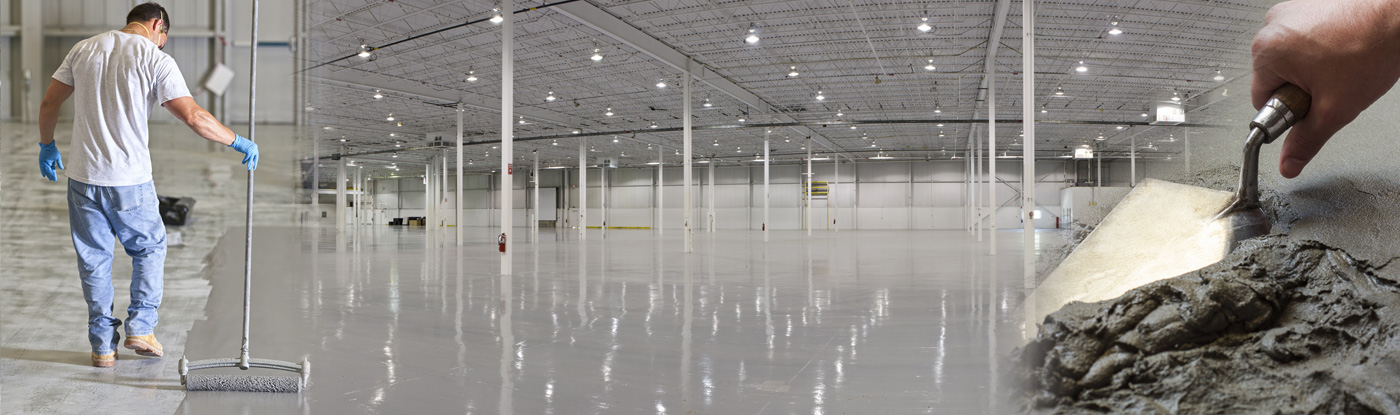
Maintaining hygienic and durable flooring in meat and poultry processing plants is crucial for meeting federal guidelines and ensuring product safety. KwikBond’s USDA-approved Repox-Mix is a high-performance epoxy coating designed to provide a long-lasting, easy-to-clean, and slip-resistant surface. Follow this comprehensive guide for preparing and applying Repox-Mix to concrete floors in federally inspected meat and poultry plants.
Materials and Tools You’ll Need:
- Repox-Mix (amount based on the area’s size)
- Broom or vacuum cleaner
- Power washer or garden hose
- Concrete cleaner or degreaser
- Stiff-bristled brush
- Epoxy roller or squeegee
- Paintbrush (for edges)
- Mixing container
- Drill with mixing paddle attachment
- Protective gloves, eyewear, and clothing
- Timer
Step 1: Clean the Area
Sweep or vacuum the concrete floor to remove dust, debris, and loose particles. A clean surface is essential for proper adhesion between Repox-Mix and the existing concrete.
Step 2: Wash the Surface
Use a power washer or garden hose to thoroughly clean the surface, removing dirt and contaminants. Apply a concrete cleaner or degreaser to eliminate any oil, grease, or stubborn stains, scrubbing the area with a stiff-bristled brush.
Step 3: Allow Surface to Dry
Allow the concrete floor to dry completely before proceeding. Moisture in the concrete can prevent proper adhesion and curing of the Repox-Mix.
Step 4: Mix Repox-Mix Components
Following the manufacturer’s instructions, combine the Repox-Mix components in the appropriate mixing container. Use a drill with a mixing paddle attachment to ensure a smooth, homogeneous mixture. Make sure to wear protective gear during this process.
Step 5: Apply Repox-Mix
Starting at the farthest corner of the room, use an epoxy roller or squeegee to apply an even layer of Repox-Mix across the concrete floor. Use a paintbrush to apply the coating to the edges and corners. Work in sections, maintaining a wet edge to prevent visible seams.
Step 6: Monitor Dry Time
Keep track of the dry time, also known as the pot life (working time), as specified by the manufacturer. The pot life may vary depending on temperature and humidity. Apply the Repox-Mix within the recommended time frame to ensure optimal performance.
Step 7: Apply Additional Coats (if necessary)
If additional coats are needed for increased durability or coverage, wait for the recommended time between coats as specified by the manufacturer. Apply the subsequent coats using the same method as the initial application.
Step 8: Cure the Repox-Mix
Allow the Repox-Mix to cure according to the manufacturer’s instructions. The curing time may vary based on environmental factors such as temperature and humidity.
Step 9: Inspect the Floor
Once the Repox-Mix has fully cured, inspect the floor for any imperfections or areas that may require touch-ups. Ensure the coating is uniform and free of defects.
Professional Concrete Repair Products for Your Property
By following this step-by-step guide, you can effectively prepare and apply KwikBond’s USDA-approved Repox-Mix to concrete floors in federally inspected meat and poultry plants. Enjoy a durable, hygienic, and slip-resistant surface that meets industry standards and ensures a safe working environment.
Contact KwikBond at (631) 298-6300 to discover how Repox-Mix can confidently rejuvenate the durability and aesthetics of your concrete surfaces.